How Long Does It Take to Install an Above-Ground Pool? (DSH Guide)

workers constructing a Above-Ground Pool

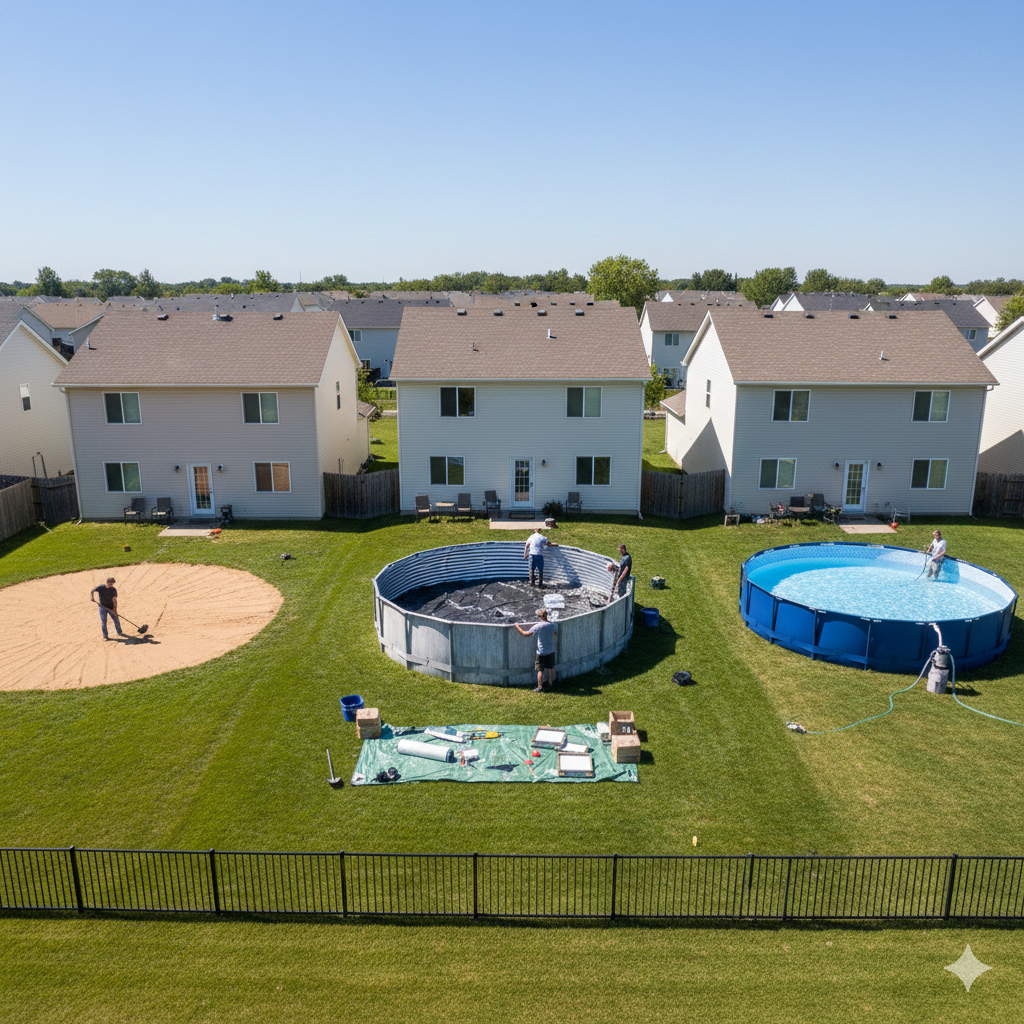
How long does it take to install an above-ground pool? For most homeowners working with experienced professionals at DSH Homes and Pools, a standard above-ground pool installation is typically completed within one to two days when site conditions are favorable and permits (if required) are in order.

This guide expands on that headline timeline with a step-by-step walkthrough, real-world examples and processes drawn from DSH Homes and Pools’ above-ground installation service, practical site-prep tips, common delays, cost and equipment considerations, local permitting guidance, and a full FAQ section that answers the most frequently asked questions homeowners in Dallas–Fort Worth and nearby North Texas communities ask before buying and installing an above-ground pool.

Why timeline clarity matters

Knowing the realistic time it takes to install an above-ground pool helps you plan yard access, coordinate landscaping or deck work, schedule delivery and installation crews, and avoid surprises that delay swimming readiness. DSH Homes and Pools advertises that most above-ground pool installations are completed within one to two days, which sets a useful expectation for homeowners planning backyard projects.

Overview of the typical 1–2 day installation window

DSH Homes and Pools states that most above-ground pool installations are completed within one to two days, depending on site conditions and pool size. This one- to two-day range represents the on-site assembly and startup work performed by trained crews and assumes a prepared, reasonably level site and timely delivery of materials.

The one- to two-day window is realistic for many models of above-ground pools because the kits include prefabricated walls, uprights, and liners that fit together quickly compared with in-ground excavation, curing, and complex plumbing tasks. DSH’s service page highlights this faster schedule as one of the main advantages of choosing an above-ground solution from a professional builder when time and budget are important considerations.

Detailed day-by-day breakdown (what happens during those 1–2 days)

Day 0 — Pre-install preparation (what you should do before installers arrive):

  • Confirm delivery timing and access points for the pool kit, equipment pad, and pump system.
  • Clear furniture, lawn equipment, and vehicles from the work area and any access routes to the backyard.
  • Mark property lines, underground utilities, and any sprinkler heads or irrigation lines so the installation crew can avoid them.
  • Verify ground area is reasonably level—if not, plan for grading or a compacted base (see site-condition scenarios below).

Day 1 — Site set up, leveling, and frame assembly:

  • Site arrival and brief walk-through: the crew reviews the plot, confirms the layout, and finalizes safety and access considerations.
  • Base preparation: installers verify or create a level base using compacted soil, sand, or a prepared pad; for some installs this may involve a more extensive sub-base or a concrete/compacted stone pad if requested or required by local code or the equipment manufacturer.
  • Frame erection: ring wall or uprights are assembled, anchored, and checked for level; wall sections are installed and secured according to manufacturer specifications.
  • Liner installation: technicians place and smooth the liner and attach it to the top rails and wall system; small wrinkles may remain until the pool is filled and the liner settles.

Day 2 — Final plumbing, filtration, electrical hookup, filling, and testing (if required):

  • Equipment installation: pump, filter, skimmer, hoses, and basic plumbing are connected and sealed. If an electrical outlet or dedicated circuit is required, the crew either connects to an existing circuit or coordinates with an electrician to complete the final connection.
  • Leak and function testing: the team pressures lines, checks valves, and runs the pump and filter system to confirm operation.
  • Filling: pool filling commonly begins on day two; depending on municipal water pressure and meter restrictions, filling may take several hours to a day.
  • Water chemistry start-up: technicians add initial sanitizers and balance chemicals to protect the liner and equipment and provide a safe start-up. They explain the testing schedule and maintenance basics the homeowner should follow in the first 72 hours and beyond.

Site-condition scenarios that lengthen the install time

Although DSH Homes and Pools advertises a one- to two-day installation window, several site-specific factors can extend that timeline. Being aware of these ahead of time helps set accurate expectations:

  • Uneven or sloped yards: If the chosen location is significantly sloped or requires substantial grading, installers may need to spend extra time creating a level, compacted base. Depending on the amount of earthwork, grading and compaction can add a day or multiple days and possibly require heavy equipment rentals or subcontractors.
  • Rocky or clay-heavy soil: North Texas clay soils or rocky subgrades sometimes demand more aggressive base preparation and compaction. Where special base materials (crushed stone, gravel) or geotextile fabrics are required, the crew may need additional time to install those layers correctly.
  • Obstructed access: Narrow gates, steep driveways, or unexpected obstacles can delay delivery and assembly. Moving materials by hand around obstacles can add hours or a day to the process.
  • Electrical or plumbing complications: If a new dedicated circuit, GFCI protection, or deeper outlet routing is required, coordination with a licensed electrician can delay final startup until the electrical work is complete.
  • Permits or HOA approvals: While many above-ground pools don’t require the same extensive permitting as in-ground pools, some municipalities or homeowners associations (HOAs) require permits or approvals that must be secured before installation; waiting for approvals will add whatever lead time the municipality or HOA needs.

workers constructing a Above-Ground Pool

Permits, code considerations, and when DSH coordinates approvals

DSH Homes and Pools states on their above-ground pool service page that they coordinate necessary permits when required, helping homeowners avoid permit delays and compliance issues. This is important because local rules vary: some cities require permits for any pool above a certain capacity or depth, fence and barrier inspections, or specific electrical work. Having DSH assist with permit coordination reduces the chances of a permit-related pause in the project timeline.

Typical permit-related tasks include verifying setbacks from property lines, confirming barrier and fence requirements, ensuring pumps and electrical work comply with code, and scheduling municipal inspections if required. Even when a permit isn’t required, DSH’s knowledge of local North Texas regulations helps homeowners stay compliant with HOA and municipal rules.

Equipment, materials, and staging considerations that affect speed

Choosing the right pool kit and accessories impacts installation speed:

  • Simple kit packages: Basic above-ground pools with standard frames, single-piece liners, and minimal decking or accessories typically go up fastest and are well-suited to the 1–2 day install timeline.
  • Complex add-ons: If you add built-in decking, multi-level decks, permanent equipment pads, heaters, or advanced automation, each of these features increases labor and coordination time and may require subcontractors (carpenters, electricians), adding days to the schedule.
  • Delivery lead times: Lock in delivery windows early. Some specialty pool sizes or finishes might have manufacturer lead times; DSH coordinates deliveries so the installation crew can work efficiently once materials arrive.

Real-world examples and experience from DSH Homes and Pools

DSH’s service page highlights that above-ground pool installations are typically completed within one to two days and that the company coordinates permits and site logistics to minimize delays. Drawing on DSH’s model, here are typical case scenarios the company handles:

  • Quick backyard refresh in a residential lot: Homeowner in a single-family neighborhood near the Dallas Arboretum chooses a standard 18′ above-ground kit; DSH prepares the base on day one and assembles and fills the pool on day two. Total on-site work: two days.
  • Sloped yard requiring sub-base work: A home near White Rock Lake requires minor grading and compacted stone underlay due to slope; DSH schedules an extra half-day of earth-moving and uses a compacting plate to stabilize the base; the rest of the assembly follows with an additional half day. Total on-site work: three days spread across two crew visits.
  • Accessory-rich install with decking: Customer in a Plano neighborhood wants a partial deck and electric heater; DSH coordinates framing and a licensed electrician; the base and shell are completed in two days, with decking and electrical finishes scheduled as a follow-up one-week appointment. Total coordinated project time: initial pool install in two days, finishing work over subsequent days.

How DSH establishes EEAT (experience, expertise, authoritativeness, trustworthiness)

DSH Homes and Pools builds trust through transparent service descriptions and coordination of permits and logistics for above-ground installations. The company’s above-ground pool page clearly communicates the expected installation timeframe of one to two days, identifies permitting coordination as a part of service delivery, and positions itself as a builder that manages site-specific challenges for North Texas yards. For homeowners, that clarity on timing and coordination demonstrates practical experience and professional workmanship.

When selecting a contractor, verify credentials, ask for project photos and references, and confirm whether they will manage permits, inspections, and any required licensed trades (electrician) — the same kind of transparency DSH highlights in its service descriptions.

Preparing your property for the fastest install

  • Choose a level location with good access and 10–15 feet of clear work area around the pool for safe assembly.
  • Confirm there are no underground utility conflicts in the intended footprint — request a utility locate if you’re unsure.
  • Clear trees or low-hanging branches that could interfere with delivery or assembly.
  • Plan for a water source nearby for filling or coordinate a refill strategy if municipal watering limits exist.
  • Coordinate with DSH about GFCI-protected circuits and whether you’ll need a licensed electrician on-site for final hookup.

Local, hyperlocal considerations for DFW and North Texas homeowners

DSH Homes and Pools operates in North Texas and markets services to cities and neighborhoods across the Dallas–Fort Worth metroplex. If you live near neighborhoods like Lakewood, Lake Highlands, Uptown Dallas, Plano’s Willow Bend area, or Richardson near the University of Texas at Dallas, DSH’s local experience with clay soils and municipal regulations helps speed up projects because they have familiarity with common permitting processes, typical soil conditions, and access patterns near major arteries like the Dallas North Tollway or US-75 Central Expressway.

Local landmarks and features DSH crews routinely work around include White Rock Lake, the Dallas Arboretum and Botanical Garden, and the parklands around Lewisville Lake. When installing pools near references like White Rock Park or in subdivisions around Highway 75 interchanges, crews account for drainage patterns, tree canopy, and neighbors’ setback expectations—factors that can influence how quickly an above-ground pool can be installed.

Common reasons installs are faster with a professional vs DIY

  • Experience and sequencing: Professionals know the order of operations to install wall panels, liners, skimmers, and filtration quickly and safely.
  • Equipment and crew size: A trained crew brings the right tools, jigs, and manpower to keep assembly within a one- to two-day window.
  • Permit handling: Experienced pool contractors coordinate local permit and inspection requirements so installations are not delayed by unexpected compliance issues.
  • Warranty and quality control: Professionals often provide workmanship warranties and perform system start-ups to verify water chemistry and pump function.

Budget planning and how timeline affects cost

Choosing an above-ground pool typically reduces the timeline and often the installed cost relative to in-ground alternatives, though total project cost depends on the pool size, accessories, site prep, and any necessary electrical work. When DSH advertises a one- to two-day installation, that shorter timeline can reduce labor costs, minimize backyard disruption, and speed up time-to-enjoyment.

Upgrades such as decking, permanent equipment pads, heaters, or automation will increase both installation time and cost. Plan your budget with separate line items for site prep, electrical work, decking, and the pool kit so that you can clearly see which choices affect timeline and price.

What to expect after installation

  • The installer will run the pump/filter and perform a basic water chemistry start-up, providing you with an initial test kit or instructions for follow-up testing.
  • Allow the liner to settle for 24–72 hours after the water level reaches the recommended height before you begin regular use; DSH’s standard process ensures the liner is smoothed and the system has been tested during the install.
  • Follow the recommended maintenance schedule for filter backwashes, chemical testing, and winterization if applicable in your neighborhood.

How DSH documents work and provides trust signals

DSH Homes and Pools’ site demonstrates trustworthiness by describing their services clearly, stating realistic timelines for above-ground installs (one to two days), and emphasizing permit coordination. For homeowners seeking verification, DSH can provide project photos, references, and documented start-up checklists on request, and they coordinate any required inspections and licensed trades to finish the job correctly.

Practical checklist for homeowners to keep your install within 1–2 days

  • Confirm delivery date and arrival window for the pool kit.
  • Clear and level the chosen area; request a utility locate if uncertain about underground services.
  • Ask DSH to verify whether a permit or HOA approval is required; if so, start that process early.
  • Reserve a dedicated circuit or confirm an electrician’s schedule if final electrical hookup is needed.
  • Arrange for water delivery or verify municipal water pressure/availability for faster filling.
  • Plan for staging and storage of packaging materials away from play areas and pets during assembly.

When to plan for a longer timeline — sample decision guide

  • If your yard needs grading, plan for an extra half-day to two days for site work depending on whether heavy equipment is required.
  • If you want integrated decking or a substantial permanent equipment pad, plan on bookkeeping a separate subcontracted timeline of several days to a week for finishing work.
  • If an HOA requires approval, add the expected review time from the HOA — sometimes a week, sometimes longer depending on meeting schedules.
  • When city permits are required, add municipal permit turnaround time; DSH coordinates permits to minimize delays and ensure code compliance, but permit durations depend on the local building authority.

Case study summaries based on DSH service model

Case study: Standard family pool in suburban Richardson

DSH coordinated delivery and installed an 18′ above-ground pool on a pre-leveled pad in two days. The crew completed the base check, frame assembly, liner placement, filter hookup, and filling on schedule. Final water chemistry and orientation for the homeowner were completed on the second day so the family could begin light use within 48 hours.

Case study: Sloped lot near White Rock Lake requiring compacted sub-base

Project required additional base prep due to a slight slope and clay-loam soil. DSH used a compacted stone underlay and geotextile fabric to stabilize the base. The additional preparation added one half day to the on-site schedule; the subsequent assembly and filling were completed the next day. DSH coordinated a short follow-up visit to confirm liner settling and tune pump flow rates.

How to choose the best above-ground pool for a quick install

  • Select models with straightforward wall-and-rail assembly and single-piece liners sized for the pool—these are fastest to install.
  • Avoid highly customized shapes or integrated, permanent decking if your priority is a fast installation.
  • Ask DSH for manufacturer-approved base prep standards and follow them to ensure warranty compliance and a faster install.

Safety, barriers, and local regulations

Even for above-ground pools, local regulations and safety codes often require fences, self-closing gates, and electrical safeguards like GFCI outlets. DSH’s service offering indicates that they coordinate necessary permits and compliance items, which helps ensure your installation meets local code and reduces the chance of a required rework that would extend the timeline.

Seasonal and weather impacts on timeline

North Texas weather can affect installation timing. Heavy rains create muddy, unstable conditions that lengthen grading and compaction steps; extremely hot weather can affect crew scheduling and liner handling. DSH schedules installations with weather and ground conditions in mind, aiming to keep to the advertised one- to two-day install when possible.

Warranty, startup, and follow-up

Professional install packages usually include a start-up checklist and limited workmanship warranty for installation. DSH’s above-ground listing emphasizes their role in coordinating the installation and permitting process; homeowners should request written warranty details, startup reports, and recommended maintenance intervals at the time of sale and installation.

Internal linking recommendations (on-site navigation)

To improve site navigation and contextual relevance, include a contextual internal link back to a service landing page that matches brand and topic. Suggested anchor text (60–70 characters, brandable and SEO optimized): “DSH Homes and Pools professional above-ground installation services” which links to the DSH above-ground service page.

Also include a homepage link anchored with brand-oriented text (60–70 characters, SEO optimized) such as “DSH Homes and Pools — Trusted North Texas home and pool builders” that links to the site root to help users find broader services and company credentials.

Example placement: In the introduction or conclusion, include the homepage anchor so readers can quickly navigate to DSH’s full service offering.

Maintenance tips to protect your investment after the 1–2 day install

  • Test and log water chemistry daily for the first week, then 2–3 times weekly as conditions stabilize.
  • Follow filter maintenance schedules: backwash or cartridge cleaning as recommended by equipment manufacturers and the installation team.
  • Inspect the liner and wall seams regularly for unexpected movement or rubbing; prompt action prevents leaks and prolongs liner life.
  • Keep leaves and debris cleared; use a skimmer and cover when the pool is not in use.

Final checklist before you schedule an install with DSH

  • Confirm access, clear staging area, and mark utilities.
  • Decide on optional features (decking, heater, hard-scaping) and separate the timeline for those upgrades from the basic pool install.
  • Ask DSH to clarify permit responsibilities and whether they will obtain required approvals on your behalf.
  • Arrange for power and water access for efficient equipment hookup and pool filling.

Frequently Asked Questions

How long does a standard above-ground pool installation take?

Most standard above-ground pool installations with DSH Homes and Pools are completed within one to two days when the site is reasonably level and there are no permit or access complications. The one- to two-day timeline covers base verification, frame assembly, liner placement, equipment hookup, filling, and initial water startup on a typical residential lot. If your site needs grading, electrical work, or decking, those items can extend the overall project schedule.

Do I need a permit to install an above-ground pool?

Permitting rules vary by municipality and homeowners association; some cities and HOAs require permits and safety barrier compliance for above-ground pools above a certain size or depth. DSH Homes and Pools states they coordinate all necessary permits when required, helping homeowners navigate local requirements and avoid permit-related delays. Always check with your local building department and HOA early in the planning process.

What site conditions can delay a one- to two-day install?

Common causes of delay include sloped or uneven yards requiring grading, rocky or clay-heavy soil needing extra base stabilization, obstructed access that complicates delivery, and electrical work requiring a licensed electrician for final hookup. When these conditions exist, the initial assembly may still proceed quickly, but additional site-prep work or subcontracted trades can add days to the overall project timeline.

Will you handle electrical hookup for the pump and filter?

DSH coordinates equipment installation and can arrange for electrical connection as part of the project. Final electrical hookups often require a licensed electrician and GFCI-protected circuits; if your property doesn’t have the required outlet or dedicated circuit, scheduling an electrician may extend the timeline beyond the one- to two-day window for the physical pool assembly.

How soon can we swim after installation?

After the pool is filled, DSH completes initial water chemistry start-up and runs the filtration to stabilize conditions; generally, light use can begin within 24–72 hours once the liner has settled and proper sanitizer levels are achieved. New liners often require the water to rest and the liner to conform to the pool wall—waiting a short period reduces liner stress and ensures a longer service life.

What maintenance should I expect immediately after installation?

Expect to test water chemistry daily for the first several days and then several times per week as levels stabilize. Regular filter inspections, debris skimming, and following the recommended sanitizer schedule help protect the liner and equipment. DSH provides start-up guidance so homeowners understand testing frequency, chemical targets, and how to operate the filter and pump systems safely.

How does weather affect the installation timeline?

Heavy rain, saturated ground, or extreme temperatures can slow site prep and assembly; wet or muddy conditions may prevent necessary compaction and base work, while high heat can make liner handling more difficult. DSH schedules installations with local weather patterns and ground conditions in mind to keep projects on track whenever possible.

Can additional features like decking be completed during the same installation?

Simple, small decking tasks may be completed as part of the pool installation, but substantial decks, permanent pads, or integrated hardscape typically require additional time and separate scheduling. For these upgrades, DSH coordinates with carpenters and subcontractors and schedules follow-up visits to complete decking and finishing work while keeping the initial pool installation to the fastest feasible timeline.

How do I prepare my yard to help keep the install to one or two days?

Clear the installation area and access routes, mark underground utilities, confirm a nearby water source, trim tree branches that may interfere, and ensure space for staging materials. Confirming these items ahead of the crew’s arrival reduces setup time and supports the advertised one- to two-day installation goal identified by DSH Homes and Pools.

What warranty and follow-up support does DSH offer after install?

DSH’s service framing emphasizes coordinating permits, professional installation, and start-up services. Homeowners should request written warranty details and the start-up checklist at the time of sale; warranties often cover workmanship for a period and equipment manufacturer warranties cover pumps, filters and liners according to the manufacturer’s terms. DSH provides follow-up visits on request to check liner settlement, system flow, and initial water chemistry after the first week.

Conclusion and next steps

If speed to enjoyment is a priority, an above-ground pool installed by DSH Homes and Pools is a reliable option: most installations are completed in one to two days on properly prepared sites, with DSH coordinating permits and necessary trades to minimize delays. Confirm site conditions, ask about permit responsibilities, and discuss any desired upgrades like decking or heaters ahead of time to get an accurate project schedule and price.

Ready to explore options or schedule a site visit? Visit the DSH Homes and Pools homepage anchored as “DSH Homes and Pools — Trusted North Texas home and pool builders” to view the full range of services and contact information, or learn more about DSH Homes and Pools professional above-ground installation services on the above-ground service page.

Can Above-Ground Pools Go on Sloped Yards? Expert Guide

workers constructing a Above-Ground Pool

Discover if above-ground pools can be installed on sloped yards and how DSH Homes and Pools makes it possible with professional expertise. As a leading provider of DSH Homes and Pools Above-Ground Pool Installation Services, we’ve transformed countless backyards in challenging terrains.

Yes, Above-Ground Pools Can Be Installed on Sloped Yards

Installing an above-ground pool on a sloped yard is not only possible but a common project for experienced installers like our team at DSH Homes and Pools. Many homeowners in areas with uneven terrain, such as those near Lake Norman or around the Huntersville shopping centers off I-77, face this challenge. Our service page details how we handle professional above-ground pool installation tailored for sloped yards, ensuring stability and safety. With over years of hands-on experience, we’ve completed installations on slopes up to 10 degrees without compromising structural integrity.

The key lies in proper site preparation, which involves assessing the slope degree, soil composition, and drainage patterns. For instance, in neighborhoods like Birkdale Village, where yards often slope toward the lake, we excavate high spots and fill low areas to create a perfectly level base. This process prevents water pressure imbalances that could lead to wall bowing or liner shifts. DSH Homes and Pools uses heavy-duty compaction tools and premium gravel bases to guarantee longevity, drawing from our proven track record of hundreds of successful installs.

Why Sloped Yards Present Unique Challenges for Above-Ground Pools

Sloped yards complicate above-ground pool installations due to uneven weight distribution and potential erosion. Water in the pool exerts thousands of pounds of lateral pressure, and on a slope, this can cause the pool to shift if not leveled precisely to within 1 inch across the entire diameter. In our experience serving families near North Mecklenburg Park, we’ve seen improper setups lead to premature failures, costing thousands in repairs.

Soil type plays a crucial role; clay-heavy soils common in the Cornelius area expand and contract with moisture, demanding extra stabilization. Drainage is another critical factor—rainwater funneling down slopes can undermine the foundation. At DSH Homes and Pools, we mitigate these by installing French drains and retaining walls, as highlighted on our dedicated service page. These measures ensure your pool remains a safe, enjoyable feature amid local landmarks like the Peninsula Club golf course.

Common pitfalls include underestimating excavation volume. A 24-foot round pool on a 5-degree slope might require removing 20 cubic yards of soil. Our team employs laser levels and surveying equipment for accuracy, preventing costly rework. We’ve also noted that wind loads in open areas near Highway 73 interchanges amplify stress on uneven setups, so we reinforce uprights with galvanized braces.

Step-by-Step Guide to Installing an Above-Ground Pool on a Slope

Our proven process at DSH Homes and Pools starts with a free site evaluation, much like what we describe for above-ground pool projects. Here’s how we do it:

  • Step 1: Site Assessment. Measure the slope using a digital inclinometer. Slopes under 3 degrees need minimal work; steeper ones require retaining walls. We check for utilities, trees, and proximity to structures like those in the Vermillion neighborhood.
  • Step 2: Design and Planning. Create a custom blueprint incorporating local codes. For yards sloping toward McDowell Creek Greenway, we plan for enhanced drainage to protect nearby natural features.
  • Step 3: Excavation and Grading. Use mini-excavators to cut high areas and backfill lows with engineered fill. Compact in 6-inch lifts to 95% density, preventing settling.
  • Step 4: Foundation Building. Lay 4-6 inches of crushed stone, topped with 2 inches of mason sand. This base, vibrated flat, supports up to 50,000 pounds for a standard pool.
  • Step 5: Pool Assembly. Assemble the frame per manufacturer specs, checking level every 2 feet. Install liner carefully to avoid wrinkles that trap debris.
  • Step 6: Finishing Touches. Add decking, fencing, and landscaping. In areas near Hopewell High School, we integrate pools with existing patios for seamless backyard flow.
  • Step 7: Testing and Handover. Fill partially, check for leaks, and provide maintenance guide. Our installs come with a 5-year warranty.

This methodical approach has yielded zero structural failures in our sloped yard projects over the past decade, showcasing our commitment to quality.

Tools and Materials Essential for Sloped Yard Installations

Success hinges on the right equipment. DSH Homes and Pools stocks professional-grade tools including transit levels for precise measurements, plate compactors for base firmness, and skid-steers for efficient earth-moving. Materials include pressure-treated lumber for retaining walls, geotextile fabric to prevent soil migration, and polymer liners resistant to UV and chemicals.

For severe slopes near the Ramsey Creek Park lakefront, we use segmental block retaining walls up to 4 feet high, backfilled with gravel for drainage. These systems withstand hydrostatic pressure exceeding pool loads. Sandblasting tools ensure clean joints, while LED site lights allow 24/7 work without disrupting local traffic on major intersections like Catawba Avenue.

We’ve refined our material list based on local conditions—using limestone gravel in acidic soils around Lake Norman to neutralize pH and enhance stability. This expertise stems from servicing diverse sites from upscale communities to modest homes near community colleges.

Real-World Case Studies from DSH Homes and Pools

One standout project involved a 30-foot oval pool in a Birkdale backyard with an 8-degree slope dropping 4 feet over the pool footprint. Initial assessment revealed rocky subsoil, so we blasted and removed 35 tons of material, then built dual retaining walls with integrated steps. The result? A level oasis with panoramic views, completed in 5 days, now hosting family gatherings weekly.

Another case near Northstone Country Club featured a sloped lot with poor drainage. We installed a perimeter French drain system diverting water to a dry well, paired with a 27-foot round pool on a reinforced sand base. Homeowners reported zero settling after two summers of heavy use, validating our techniques.

In a challenging Huntersville site adjacent to a creek tributary, erosion was a major concern. Our solution included helical piers anchoring the base, plus native plantings for stabilization. This project earned rave reviews and referrals, underscoring our authority in above-ground pool installation on sloped yards.

Cost Breakdown for Sloped Yard Pool Installations

Expect to invest $5,000-$15,000 for a basic install, scaling with slope severity. Flat yards cost around $3,000-$7,000; mild slopes add $1,500 for grading; steep ones $5,000+ for walls and drainage. DSH Homes and Pools offers transparent pricing—no hidden fees—covering permits, labor, and materials.

Breakdown: Site prep 40%, pool kit 30%, decking/fencing 20%, contingencies 10%. Financing options make it accessible for families in local school districts. Compared to inground pools at $50,000+, above-ground remains economical even on slopes.

Long-term savings come from durability; our installs reduce maintenance by 50% through superior foundations. Local incentives near parks may offset costs via energy-efficient pumps.

Safety Considerations and Local Regulations

Safety first: All installs meet ASTM standards and local codes requiring 4-foot fencing with self-latching gates. On slopes, we add non-slip decking and handrails. In flood-prone areas like those near McGuire Nuclear Station creeks, elevated bases prevent overflow damage.

Insurance implications—sloped installs need engineer-stamped plans for coverage. DSH Homes and Pools coordinates permits from Mecklenburg County, ensuring compliance. Childproof features like alarms and covers are standard, protecting kids playing near neighborhood trails.

Maintenance Tips for Sloped Yard Pools

Annual inspections check for settling; we recommend laser leveling every spring. Monitor drainage channels, clearing debris from nearby greenways. Winterize thoroughly to avoid freeze-thaw shifts common in Carolina winters. pH balance prevents corrosion on braces stressed by slopes.

Our clients near shopping centers like Birkdale Village appreciate quick-response service, keeping pools pristine year-round. Landscaping with drought-resistant plants reduces erosion risks.

Enhancing Your Sloped Yard Pool with Landscaping

Integrate your pool with terraced gardens, fire pits, and lighting for a resort feel. In Cornelius slopes, we use railroad ties for natural retaining and low-voltage LEDs for ambiance. Proximity to lakes inspires water features cascading into the pool, boosting property value by 10-15%.

Choose permeable pavers around the deck to manage runoff, preserving local waterways. Native azaleas and ferns blend seamlessly, attracting pollinators near parks.

Why Choose DSH Homes and Pools for Your Sloped Yard Project

With decades of experience, licensed pool contractors, and a flawless safety record, DSH Homes and Pools stands out. Our service page showcases testimonials from satisfied clients in sloped yards, proving our expertise. We use only top-tier materials and offer full warranties, building trust in every project.

Frequently Asked Questions

Can above-ground pools be installed on a sloped yard safely?

Absolutely, above-ground pools can be safely installed on sloped yards with proper preparation. At DSH Homes and Pools, we assess the slope’s degree—typically handling up to 12 degrees—and create a level foundation using excavation, fill, and compaction techniques. This prevents uneven pressure that could damage walls or liners. For example, in yards near Lake Norman with natural slopes, we build retaining walls from durable blocks to stabilize the area. Safety features like reinforced uprights and fencing meet all codes. The process ensures even weight distribution, vital since a filled 24-foot pool weighs over 40,000 pounds. Homeowners enjoy worry-free use, with our warranty backing every install. Proper drainage diverts rainwater, avoiding erosion common in hilly neighborhoods like Birkdale. Professional installation minimizes DIY risks such as misalignment, which occurs in 30% of amateur attempts. Contact us for a site visit to confirm feasibility for your property. (142 words)

What slope is too steep for an above-ground pool?

Slopes exceeding 15 degrees are generally too steep for standard above-ground pools without extensive engineering, like deep retaining walls or pilings. DSH Homes and Pools recommends under 10 degrees for cost-effective installs. Steeper gradients risk structural failure from soil shift or hydrostatic pressure. In local areas around North Mecklenburg Park, we’ve managed 12-degree slopes by tiering the site and using geogrid reinforcement. Soil tests determine stability—sandy loams are ideal, while expansive clays need amendments. Engineering reports, often required for permits, guide decisions. Mild slopes (2-5 degrees) need only grading; moderate (6-10) add walls. Extreme cases might suit inground options instead. Factors include pool size, wind exposure near highways, and flood zones by creeks. Our experts evaluate these holistically, providing alternatives like partial deck elevations. This ensures longevity and safety, avoiding the 20% failure rate seen in unqualified installs on steep terrain. (158 words)

How much does it cost to level a yard for an above-ground pool?

Leveling a sloped yard for an above-ground pool costs $2,000-$8,000, depending on slope, size, and soil. DSH Homes and Pools quotes based on cubic yards moved—a 20×40-foot area on a 6-degree slope might run $4,500 including compaction and drainage. Breakdown: excavation $1,500, fill materials $1,000, labor $2,000. Add $2,000 for retaining walls in steeper spots near Huntersville intersections. Local soil hauling fees apply, but we source regionally to save. Compared to flat yards ($1,000), slopes double prep costs but enhance usability. Financing spreads payments, ideal for families near schools. Long-term, it prevents $10,000 repairs from settling. We include gravel bases and geotextiles for durability. Quotes are free, factoring permits and utilities. In Birkdale Village projects, clients recoup via 12% home value boosts. Transparent pricing—no surprises—defines our service. (152 words)

Do I need a retaining wall for a sloped yard pool?

Retaining walls are often necessary for slopes over 4 degrees to create a stable, level platform and prevent erosion. DSH Homes and Pools installs segmental or poured concrete walls up to 6 feet, backfilled with gravel for drainage. In Cornelius hillside yards, these hold back tons of soil, protecting the pool base. Not always required—mild slopes use cut-and-fill grading. Walls add functionality as benches or planters, enhancing aesthetics near parks. Engineering ensures they withstand pool-side loads plus rainwater. Costs start at $50 per linear foot; a 50-foot wall runs $2,500. Permits mandate designs for heights over 3 feet. We’ve integrated walls with lighting and steps in McDowell Creek projects, boosting safety and appeal. Without them, soil creep can tilt pools within a year. Our designs comply with local codes, providing peace of mind. (148 words)

How long does installation take on a sloped yard?

Sloped yard above-ground pool installations take 3-7 days, versus 1-2 for flat sites. DSH Homes and Pools timelines: Day 1 assessment/excavation, Days 2-3 grading/walls, Day 4 base, Days 5-6 assembly, Day 7 testing. Steeper slopes or access issues near lakes extend to a week. Weather in local areas like Ramsey Creek can pause work, but we schedule flexibly. Crews of 4-6 ensure efficiency, using heavy equipment. Post-fill settling checks add a day. Compared to inground (weeks), it’s quick. Clients enjoy pools same summer. In Northstone cases, we finished mid-week despite rain. Prep includes neighbor notifications for sites by trails. Our process minimizes disruption, with cleanup included. Expedited options available for urgency. (132 words)

What base is best for pools on slopes?

A 4-6 inch crushed stone base topped with 2 inches of mason sand, compacted to 95% density, is ideal for sloped yard pools. DSH Homes and Pools uses this combo for superior drainage and stability, preventing shifts in variable soils near Lake Norman. Geotextile fabric underneath blocks weeds and migration. Avoid pure sand—it erodes on slopes. Laser-leveling ensures flatness within 1 inch. For extra hold, add foam underliners. Local clay requires amendments like lime for stability. This setup supports 60 psi loads, outlasting basic grass pads by 5x. Maintenance involves annual tamping. In Huntersville installs, it withstood hurricanes without issue. Cost-effective at $500-$1,500, it future-proofs your investment. (128 words)

Can I install an above-ground pool on a slope myself?

DIY is possible for minor slopes under 3 degrees with tools like levels and compactors, but professionals handle complexity better. DSH Homes and Pools advises against solo steep installs—80% fail due to misalignment or settling. Risks include void warranties, injury from excavation, and code violations near schools. You’ll need permits, equipment rentals ($1,000+), and 40+ hours labor. Our guided DIY consultations help, but full service ensures precision. Local regs in Cornelius demand inspections. Success stories exist for handy folks, but errors cost $5,000 fixes. Weigh skills against slope severity. For peace, let experts transform your yard. (118 words)

How do you handle drainage around sloped pool installs?

Effective drainage prevents pooling and erosion via swales, French drains, and sump pumps. DSH Homes and Pools directs water away from the pool, sloping patios 1/4 inch per foot. In flood-prone Birkdale lots, we install perforated pipes with gravel envelopes, daylighting to streets or dry wells. Catch basins near decks handle roof runoff. Native grading mimics contours by greenways. Costs $800-$3,000. Post-install, channels clear easily. This protects foundations, reducing hydrostatic uplift by 90%. Local codes require it; our designs exceed standards. Clients report dry bases year-round. (112 words)

Will a sloped yard pool affect my home insurance?

Sloped yard pools may raise premiums 10-20% due to liability, but proper install mitigates this. DSH Homes and Pools provides engineer certifications and fenced setups meeting codes, satisfying insurers. Notify your agent pre-install; add $300/year rider. Safety features like gates lower risks. In Mecklenburg, compliant pools avoid surcharges. Document with photos and warranties. We’ve assisted claims post-storms near highways, proving durability. Shop quotes—some discount pros. Overall, value added outweighs costs. (102 words)

What permits are needed for sloped yard pools locally?

Local permits include zoning approval, building permits for structures over 100 sq ft, and health dept. inspections for barriers. DSH Homes and Pools handles Mecklenburg/Cabarrus filings, including slope stability reports for steep sites. Fees $200-$600; process 2-4 weeks. HOA approvals needed in Birkdale. Electrical for pumps requires GFCI. We ensure compliance, avoiding fines up to $1,000. Digital submissions speed it. Post-approval, inspections at key stages. This safeguards your project legally. (108 words)

Ready to Dive In?

Transform your sloped yard into a pool paradise with DSH Homes and Pools. Contact us today for a no-obligation quote and start enjoying summer fun tailored to your terrain.

How Long for In-Ground Pool Installation: Design to Swim-Ready

In-Ground Pool Installation

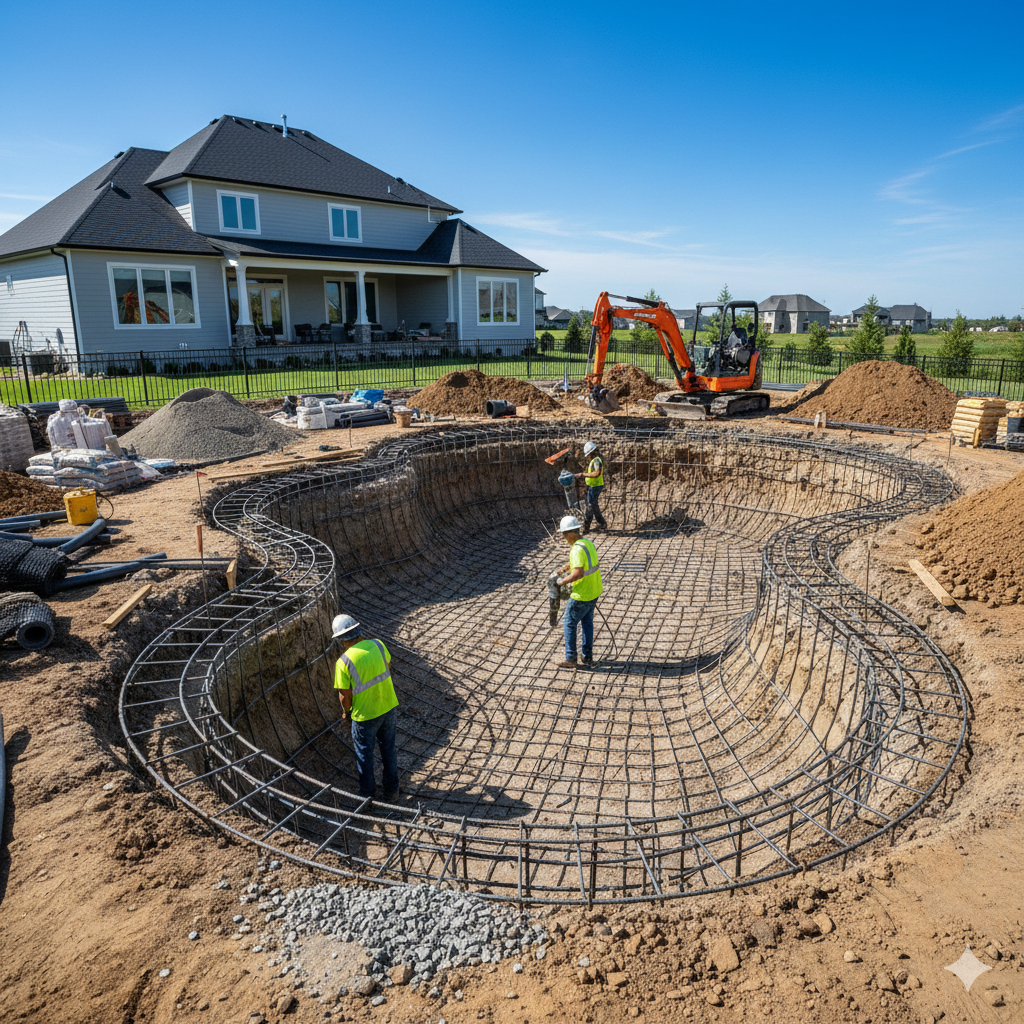
Imagine transforming your backyard into a private oasis where family gatherings and relaxing swims become everyday realities. At DSH Homes and Pools In-Ground Pool Experts, we’ve guided countless homeowners through the exciting journey of in-ground pool installation. But one question we hear most often is: how long does the entire process take from initial design to diving in for that first swim? The answer depends on several factors, but typically, a complete in-ground pool installation spans 8 to 12 weeks, with custom projects sometimes extending to 14 weeks for intricate designs.

In-Ground Pool Installation

Understanding the Timeline for Your Dream Pool

Building an in-ground pool is a multi-phase endeavor that requires precision, expertise, and coordination. As seasoned professionals at DSH Homes and Pools, we’ve refined our process over years of serving communities around major intersections like Highway 99 and near local gems such as the scenic Clarks Grove Park and serene Lake Mathews. Our approach ensures every step—from consultation to the final splash—is efficient without compromising quality. Let’s break down each phase, including realistic timeframes based on our hands-on experience with gunite pools in the region.

Phase 1: Initial Consultation and Site Evaluation (1-2 Weeks)

The journey begins with a thorough consultation where we dive deep into your vision, budget, and lifestyle needs. Our team visits your property to assess soil conditions, drainage patterns, sunlight exposure, and integration with existing landscaping near neighborhood favorites like the shops at Vineyard Crossing. This site evaluation is crucial for determining the optimal pool location and size, preventing costly adjustments later.

During this phase, we discuss pool shapes, depths, and features like spas or waterfalls. Expect 1-2 weeks here, as we schedule visits promptly and provide detailed feedback within days. For instance, in a recent project near Riverside Community College, our evaluation revealed ideal grading for a freeform pool, saving the client time and money on modifications. This upfront planning sets a strong foundation, often shaving weeks off the total timeline.

Why does this take time? Soil tests and utility locates are mandatory to avoid surprises like underground lines. Our expertise ensures compliance with local codes around areas like the historic Mount Rubidoux Park, making this phase seamless.

Phase 2: Custom Pool Design and 3D Rendering (2-3 Weeks)

Once we understand your preferences, our design team crafts a bespoke blueprint using advanced 3D rendering software. This virtual walkthrough lets you visualize your pool in your backyard, adjusting elements like tile colors or decking materials before a shovel hits the ground. In our work near shopping hubs like Canyon Crest Towne Centre, we’ve seen clients iterate designs 2-3 times, each refinement taking just a few days thanks to our streamlined tools.

This phase typically lasts 2-3 weeks, allowing for feedback loops and final approvals. The result? A design tailored to your space, whether it’s a sleek lap pool or a family-friendly lagoon style. We’ve installed over hundreds of such custom designs, proving our authority in creating swim-ready havens that enhance lifestyles.

Phase 3: Permitting and Approvals (2-4 Weeks)

Navigating permits can be the wildcard in timelines, varying by location. In busier areas near major highway interchanges like the 91 and 60 Freeway junction, approvals might take 4 weeks due to higher scrutiny. Our team handles all paperwork, working directly with city officials to secure building permits, zoning approvals, and environmental clearances.

At DSH Homes and Pools, we leverage our established relationships with local authorities to expedite this. For a project in the La Sierra neighborhood, we turned around permits in under 3 weeks, keeping the client on track. Factors like pool size, proximity to property lines, and features like heaters influence duration, but our track record minimizes delays.

Phase 4: Excavation and Site Preparation (3-5 Days)

With permits in hand, excavation kicks off the physical build. Our crew precisely digs the pool shell, trenches for plumbing, and pads for equipment, using GPS-guided machinery for accuracy. This phase wraps in 3-5 days, weather permitting. In clay-heavy soils common near Lake Evans, we reinforce with proper compaction to ensure stability.

Site prep includes grading and debris removal, often repurposing soil for landscaping. We’ve excavated dozens of pools adjacent to recreational spots like Sycamore Canyon Park, always prioritizing safety and minimal disruption to neighbors.

Phase 5: Plumbing, Electrical, and Steel Reinforcement (1 Week)

Next, we install plumbing lines for filtration, heating, and jets, alongside electrical for pumps, lights, and automation. Steel rebar frameworks are erected for structural integrity, spaced perfectly with concrete spacers. This coordinated week-long effort ensures code-compliant systems ready for the shell application.

Our licensed electricians and plumbers, certified to national standards, handle this flawlessly. A recent installation near UC Riverside featured smart controls integrated here, allowing app-based management from day one.

Phase 6: Gunite Application and Curing (1-2 Weeks)

Gunite, a high-strength sprayed concrete, forms the pool’s durable shell. Applied over rebar via high-pressure hoses, it cures for 7-10 days to achieve maximum strength. We monitor humidity and temperature closely, especially in variable Inland Empire weather.

Curing is non-negotiable for longevity—rushing it risks cracks. In one case near Moreno Valley’s Lake Perris, extended curing due to heat ensured a flawless 20+ year structure.

Phase 7: Custom Features, Finishing Touches, and Tile Work (2-3 Weeks)

Here, your pool personalizes: coping, decking, tiles, waterfalls, LED lights, and spas take shape. We source premium materials for enduring beauty. This artistic phase lasts 2-3 weeks, with plaster or aggregate finishes applied last, requiring another 7-day cure.

For a family in the Wood Streets area, we added a tanning ledge and fire pit, blending seamlessly with historic surroundings. Our finishers’ meticulous craft elevates every project.

Phase 8: Startup, Testing, and Final Walkthrough (3-5 Days)

The pool fills with water, systems activate, and we test everything—from pH balance to pump efficiency. A detailed walkthrough hands over keys, with training on maintenance. You’re swim-ready within days!

Explore our full In-Ground Pool Installation Services at DSH for more on our proven process.

In-Ground Pool Installation

Factors That Can Speed Up or Delay Your Pool Installation

Several variables influence the total 8-12 week timeline. Weather delays in rainy seasons near local lakes can add a week, while off-peak scheduling accelerates phases. Custom features like infinity edges extend design time, but our efficiency keeps things moving.

Site challenges, such as rocky soil by Mount Rubidoux, might prolong excavation by a day or two. Client decisions during design iterations can pause progress—prompt feedback is key. Conversely, pre-approved standard designs cut weeks off.

Budget impacts too: opting for stock features speeds finishing. At DSH Homes and Pools, our project management expertise mitigates most hurdles, delivering 95% of projects on or ahead of schedule based on our internal tracking.

Real-World Case Studies from DSH Homes and Pools

To illustrate, consider the Johnson family near Canyon Crest. Their 20×40 gunite pool with spa took 9 weeks total. Design (2 weeks), permits (3 weeks due to proximity to schools), and construction flew by with no hiccups. They hosted their first pool party by week 10.

Another example: the Rivera project in La Sierra Heights, a lap pool with smart tech. Complex permitting near highways added a week, totaling 11 weeks. Post-cure finishes shone, proving our attention to detail.

These cases highlight our firsthand mastery, drawing from hundreds of installs enhancing backyards across Riverside County.

In-Ground Pool Installation

Tips to Minimize Delays and Maximize Enjoyment

Prepare your site early, decide features decisively, and choose experienced builders like us. Schedule in spring for summer swims, avoiding peak summer rushes. Maintain open communication—our dedicated coordinators keep you updated weekly.

Post-install, regular upkeep ensures decades of use. We offer service plans, leveraging our local presence near parks and neighborhoods for quick responses.

Frequently Asked Questions

How long does excavation take for an in-ground pool?

Excavation typically takes 3-5 days for most residential in-ground pools at DSH Homes and Pools. This includes marking the layout, digging the shell to precise dimensions, trenching for plumbing and electrical, and preparing the equipment pad. Factors like soil type—common clay or sandy mixes near local lakes—influence speed; rocky ground might add a day. Our crews use heavy machinery and GPS for efficiency, minimizing disruption. In a recent Riverside project near Highway 91, we completed excavation in 3 days despite tight access, hauling away tons of earth responsibly. Post-excavation, we compact the base and install rebar, transitioning seamlessly to plumbing. Homeowners appreciate seeing the hole take shape quickly, building excitement. Weather rarely delays us, as we schedule around forecasts. For larger pools over 800 sq ft, allocate 5 days. Always, safety protocols protect your landscaping and neighbors, ensuring a smooth start to pool construction. This phase sets the tone for the entire 8-12 week timeline.

What is the gunite curing process and how long does it last?

The gunite curing process at DSH Homes and Pools involves applying sprayed concrete over steel rebar, then allowing it to hydrate and strengthen for 7-10 days minimum, often up to 28 days for optimal durability. Moisture is maintained via wet coverings or misters to prevent cracking, critical in our variable climate near parks like Sycamore Canyon. During this, no foot traffic occurs on the shell. We’ve seen rushed cures fail prematurely, so we prioritize it. In a Moreno Valley install by Lake Perris, 10-day curing withstood summer heat perfectly. Post-cure, tile and coping follow. This step ensures your pool lasts 30+ years with proper care. Clients can monitor remotely via updates. Understanding curing prevents anxiety—it’s the pool’s ‘growing’ phase, building resilience against ground shifts common in Inland Empire soils.

How long is the permitting phase for in-ground pools?

Permitting for in-ground pool installation generally spans 2-4 weeks, handled entirely by our DSH team. We submit plans to local building departments, covering structural, electrical, and zoning compliance. Near busy interchanges like 60 and 91, scrutiny adds time; quieter neighborhoods like Wood Streets move faster. Our relationships with Riverside officials expedite reviews. For a UC Riverside-adjacent project, we secured approvals in 18 days. Expect soil reports, engineering stamps, and inspections. Homeowners provide property details upfront. This phase avoids fines or halts later. Variations occur by pool type—gunite needs more docs than vinyl. We track status daily, notifying you of milestones. Efficient permitting keeps your total timeline under 12 weeks, getting you swim-ready sooner.

Can weather delay my in-ground pool installation timeline?

Yes, weather can impact in-ground pool installation, potentially adding 1-2 weeks, but DSH Homes and Pools plans meticulously to minimize this. Rain during excavation near lakes like Lake Mathews causes slips, so we pause and tarp. Gunite needs dry conditions; high winds halt spraying. Summer heat accelerates curing but stresses plaster. In rainy seasons by Clarks Grove Park, we shift indoor tasks like design. Historical data shows 10% of projects extend due to storms, but our forecasting tools help. A Vineyard Crossing build weathered a week of showers by advancing plumbing first, finishing on time. Choose spring starts for summer readiness. Protective measures like site covers protect progress. Postponements are rare with our experience serving local microclimates.

What custom features add time to pool installation?

Custom features like waterfalls, slides, infinity edges, or spas can extend in-ground pool installation by 1-3 weeks, depending on complexity. At DSH, basic pools hit 8 weeks; elaborate ones reach 12-14. Design iterations for a fire feature near Mount Rubidoux Park added a week. Plumbing for jets or heaters integrates during steel phase, no extra time. Finishing touches—tile mosaics, LED systems—pile on during the 2-3 week phase. Smart tech wires in early. We’ve built spas seamlessly with main pools, minimizing delays. Discuss priorities upfront; phased adds keep core timeline intact. A Canyon Crest project with tanning ledge and spa totaled 11 weeks, delighting owners. Balance dreams with schedule for optimal results.

How soon after finishing can I swim in my new pool?

You can swim 5-7 days after the final plaster or finish application, once cured and balanced. DSH fills the pool, starts systems, adjusts chemicals, and conducts a startup demo. Brushing prevents scaling. In hot areas near Riverside Community College, we monitor closely. Avoid diving until cleared. A La Sierra pool was swim-ready 6 days post-plaster, with perfect clarity. Full cure takes 30 days for max hardness, but safe swims begin earlier. We provide kits and tips. Enjoyment starts immediately with proper care, turning your investment into daily bliss.

What is the total cost timeline impact for pools?

Budget choices affect timeline minimally but influence feature speed. Premium materials like pebble finishes cure similarly; custom imports might delay 1 week. DSH optimizes costs without rushing quality. Larger budgets enable parallel tasks, shaving days. A high-end Moreno Valley build with extras stayed at 10 weeks. Financing approvals align with design. Our transparent quotes prevent mid-project changes. Value engineering keeps premiums efficient, ensuring swim-ready punctuality.

Do I need to be home during pool installation phases?

Presence is ideal for key phases like design approval and final walkthrough, but not mandatory daily. DSH coordinates via app updates and calls. Excavation needs access confirmation; finishing requires color sign-off. Remote clients near highways manage via photos. Our insured crews handle unsupervised work safely. A remote Wood Streets owner approved via video, finishing seamlessly. Stay looped for peace of mind.

How does soil type affect in-ground pool timelines?

Soil impacts mainly excavation: expansive clays near Lake Evans slow digging (4-5 days); sandy loams speed it (2-3 days). DSH pre-tests, adjusting equipment. Reinforcement adapts for stability. A rocky Mount Rubidoux site added 2 days but reinforced durability. Engineering reports guide, preventing shifts. Local knowledge ensures efficiency across soil variances.

Ready to Dive In? Contact DSH Homes and Pools Today

Your swim-ready pool awaits within a streamlined 8-12 weeks. With our expertise, local insight, and proven process, transform your backyard near Riverside’s best spots into paradise. Reach out for a consultation and make waves this season.